It is always suggested that you should have a passcode for your mobile device, like your iPad, to protect yourself from unwanted breach of privacy. Having a passcode for your device would mean that people won’t be able to just access your device unless they know the passcode and unlock it.
The problem with having a passcode is that this puts your iPad at risk of being disabled. There are only six chances to guess the passcode correctly. If you or someone else fails, your iPad is disabled. Fortunately, there is the solution to solve this problem. In the next section, we’ll discuss what to do if your iPad is disabled.

Part 1. Fixing a disabled iPad
No one wants to see their iPad disabled because this prevents them from using it. Fortunately, there are ways that you can solve this issue. One is through the use of your iTunes account, and the other is through the use of your iPad’s recovery mode.
It is important to remember, though, that the methods to solve your disable your iPad issue will require that you erase all of the data of your device, including its settings. So unless you have backed up your iPad before it’s disabled, there’s no way for you to recover your data.
Solution 1: Using iTunes to Fix your Disabled iPad
This method is possible if you have synced your iPad to your iTunes account before it got disabled. Through your iTunes account, you can back up your iPad’s data and erase everything on the device, which includes the passcode you have inputted. Here’s how you can do it:
- Connect your iPad to the computer that you used to sync it with using your iTunes account
- Open your iTunes account
- If your iPad is still disabled or it didn’t automatically sync with your iTunes account, click Back Up Now
- Click Restore from iTunes backup after the sync and backing up is completed
- Select the backup file you want to use to restore your iPad (you can view the date and size and see which among them is the most relevant to restore your iPad)
- Just relax and wait while iTunes completely restores your iPad
Solution 2: Using Recovery Mode to Fix your Disabled iPad
If you have yet to sync your iPad to your iTunes, the only way you can restore your device back is through the recovery mode. Fixing your iPad with this method, though, will erase all of your files and data, including the passcode, without any backup. Here’s how you do it:
- Turn off your iPad
- Press and hold the Home button while connecting it to a computer, which will also turn the device on
- Continue holding the Home button and wait for the screen to prompt Connect to iTunes
- iTunes will then show a message saying that it detected the device is in recovery mode > Click Ok > Restore the device
 This will effectively erase all of the data, files, and settings of your iPad, including your passcode, allowing you to open and use it once again. If you don’t have a backup file for your device’s contents, then there’s no way you can recover them back, unless you use a third party solutions provider.
Fortunately, one company has a software that can help you in these kinds of problems, even if you don’t have backup files, and that is FoneDog Mobile Solution Provider. Their iOS System Recovery software is designed to provide you with a way to safely fix the issue of your disabled iPad without the worry of losing your data.
Part 2. Quickly Fix iPad is Disabled Using the iOS System Recovery
FoneDog’s iOS System Recovery is a great software program to have if you want to fix several problems with issues with your iOS devices. It is designed to fix problems and issues, such as looping Apple logo, slide not working, being stuck in recovery mode, the black, red, and blue screen issue, and many more.
The best part about all of this is that this software program can do all of these things without the need to erase or damage your data. It keeps your data safe and secure as it is restoring your device back to normal.
Step 1: Download and Launch Fonedog Toolkit
To use this software, you would first need to install the FoneDog toolkit and launch. Next, you would need to click on iOS System Recovery and connect your iPad to the computer. The program would automatically detect your device and once it does, click the Start button. 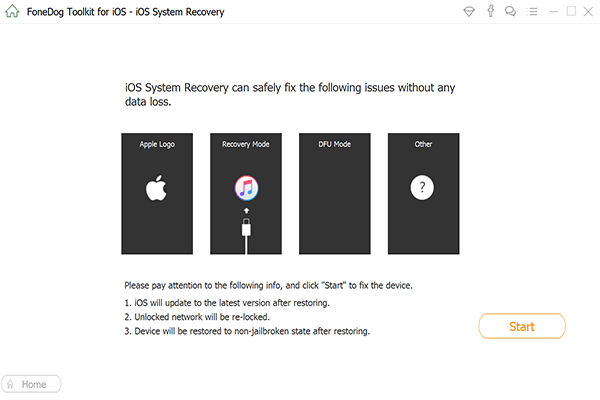
Step 2: Download Firmware
The software will then ask you to download the firmware, which you need to press okay to proceed with the download. The firmware is what FoneDog will be using to fix the problem with your iPad. It will be providing the latest iOS to download and you just need to click Repair and wait for it to finish. 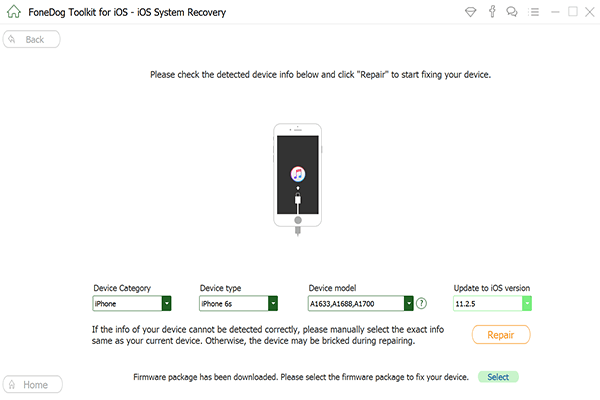
Step 3: Automatically Repair
After finishing the download process, the software program will automatically repair your iOS. Just remember not to use your device while it is repairing to avoid the risk of the device being bricked. Once the repair is done, don’t just unplug your device to the computer. Wait for your device to reboot first and for FoneDog to say that it is already okay to unplug. 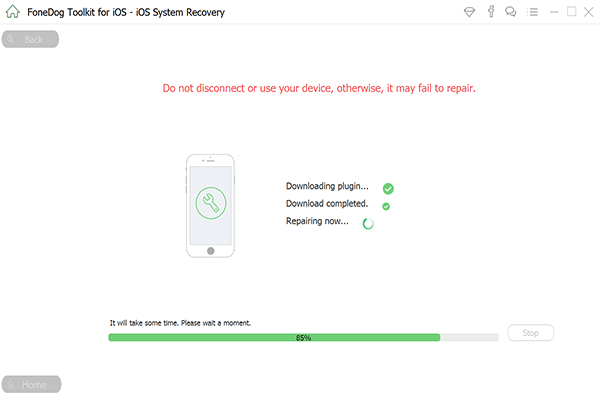
Part 3. Conclusion
Getting your iPad disabled is never a pleasant scenario, but there are other ways that can be found at online manuals like manualsnet.com that can help you to fix it and it will only involve the use of your iTunes account. If you have already synced your device to your iTunes account, you can easily restore it back to normal and use the backup files you have so your device won’t be starting from scratch.
If you are unfortunate enough not to have synced your device to your iTunes account, you can still restore it back to normal. But there is no way for you to recover your files and data, as they will be deleted forever once you restore your device.
Now in this scenario, I recommend using the iOS System Recovery of FoneDog, which can help you restore your iPad back to normal, without the need to delete all of your files and data. The beauty of this software is that you can try it out for free for 30 days before you are required to purchase it. This allows you to test out the software without any risks on your part.