In this article, I am going to focus on how one can upload OST file to Office 365 Cloud mailbox in the best possible way.
Microsoft Office 365 is designed to offer the best solution providing a collection of applications or services to the users. Office 365 (Exchange Online or Outlook 365) allows you to grow your business enhancing the productivity of the work which in return increases the quality of the work. It provides various applications such as Excel, Word, OneNote, Outlook, Microsoft Team, etc. in one platform only.
Even Microsoft offers Office 365 with a different enterprise such as Office 365 Business Essential, Office 365 Business Plan, Office 365 Enterprise E1, etc. You can make use of any of the enterprises according to the size of the organization or the requirement.
Benefits of Office 365 in an Organization
- A powerful source of communication all over the globe.
- Offers an innovative and simplified way of working.
- Quick and improved result with quality.
- More secure that allows easy recovery of data from loss.
- Accessible from anywhere and from any device.
- Easy and effective collaboration and document sharing.
- Low maintenance cost and does not require any physical implementation.
- Always provides an updated version of Exchange Online.
Methods to Convert OST File to Office 365 – Step-by-Step Guide
- The manual way of OST to Office 365 Migration.
- With the help of OST to Office 365 Converter.
How to Import OST to Office 365 Exchange Online – Manual Process
When migrating the OST data file to Exchange Online mailbox you need to follow the below two steps.
Step 1: How to Convert OST File to PST Format
- Launch the Microsoft Outlook email client.
- Go to File and click on Open & Export → Import/Export.
- Select Export to a file and hit the Next button.
- Choose Outlook data file (.pst) and Next.
- Select the folder to export and then select the destination to save the PST → Finish.
Step 2: How to Migrate PST File to Office 365 Mailbox
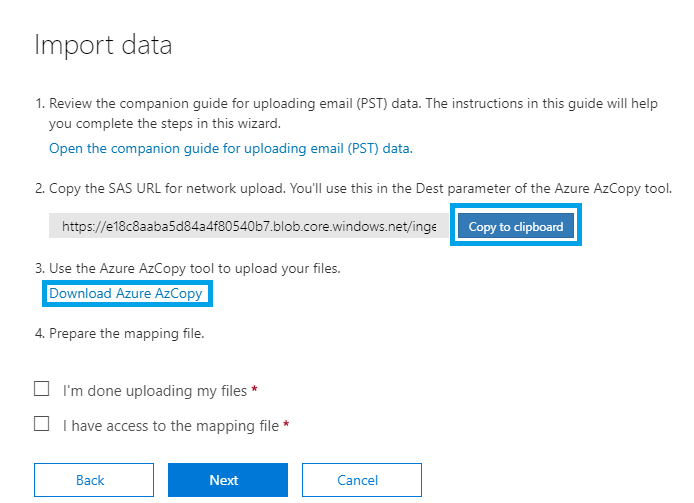
1) Get the unique SAS URL and install Azure AzCopy Tool
Go to the Security and Compliance Centre, then Information Governance →Import and then click on Import PST files.
A new import job page will appear, hit on + New Import Job. Type the name of the job and hit the Next button.
Choose the type of method you want to execute for Office 365 Import service. Here, select Upload your data option and then Next.
Click on the Show Network Upload SAS URL to make the destination URL visible and download the AzCopy tool to upload the PST files.
2) Upload PST to the Azure Location and Then to Office 365
Run the below command in the AzCopy tool in order to move PST files to the Azure area on a permanent basis.
AzCopy.exe /Source:<Location of PST files> /Dest:<SAS URL> /V:<Log file location> /Y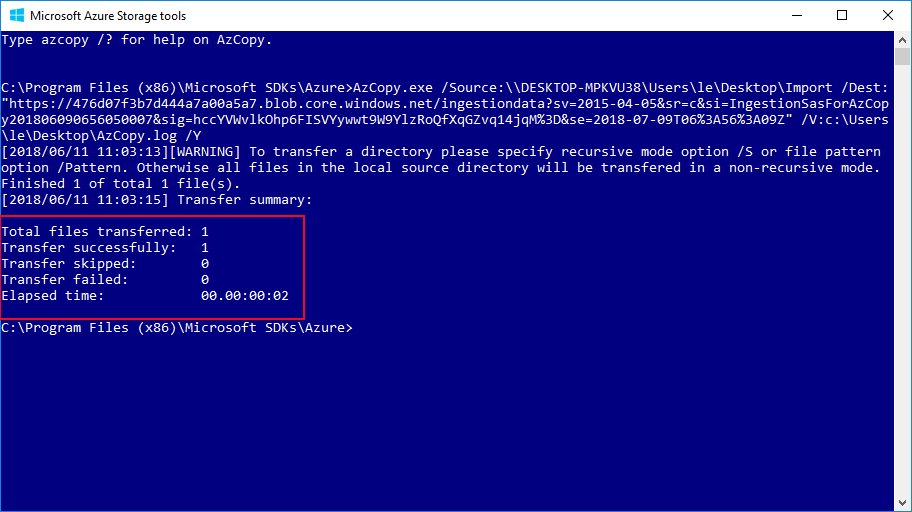
Prepare for mapping of the PST file selecting both the below options:
- I’m done uploading my files.
- I have access to the mapping files.
Click next; you move to the mapping page.
Here, first, you need to create a CSV file in a particular format. Then you need to click on + Select mapping file→ Validate→ Save→ Close.
Now go to the import job page, find the newly created job. Click on Ready to Import to Office 365.

A new page will open where you can select choose to filter data whether you want to filter chooses before importing or do not want to filter.
How to Change OST to PST in Office 365 – OST to Office 365 Converter
From the above manual process, it is clear that you need to follow a very long process of exporting OST file to Office 365 environment. Therefore, people like to use a professional way of moving OST file to Exchange Online platforms such as MailsDaddy OST to Office 365 Migration Tool.
Features of this brilliant OST to Office 365 Tool:
- Hassle-free batch migration without any issue.
- Convenient to use and has an understandable working operation.
- A suitable solution for healthy, inaccessible, offline or corrupted OSTs.
- Allows previewing the complete details of OST files.
- Keeps the OST file structure preserved maintaining the originality.
- It offers an effortless recovery solution importing to the O365 account.
- Move IMAP, Hotmail or Exchange Server OST to Office 365 OWA.
To know more about the software, you can visit here:
https://www.mailsdaddy.com/ost-to-office-365-migration-tool/
Working of OST to Office 365 Conversion Tool
For Single OST Migration:
- Click on the Add file, a small window appears. Insert OST and then hit the Scan button→ OK.
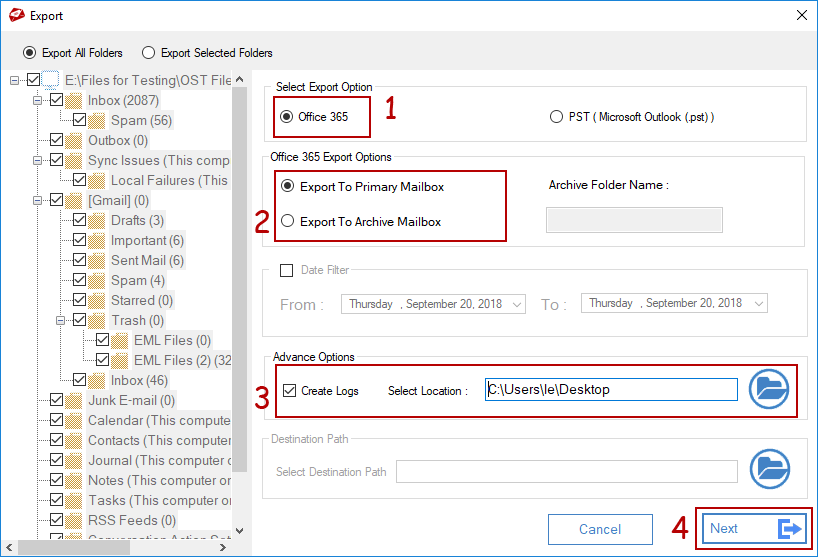
- Go to the Export option and choose Office 365. Select the Exchange Online mailbox and hit Next.
- Enter the ID and Password of Microsoft Office 365 and start the migration process.
- After completing the tasks, you receive a message of completion.
For Batch OST Conversion:
Here, first, you need to create a CSV file with OST file location, O365 Username and Password. Click on Bulk Export and browse the CSV. Select all the options required or needed then hit Next and the Sign to Office 365 account.
Impersonate Export:
In this feature, again, you need to create a CSV but here you do not require a password. This feature by is specially designed for the Administrator to perform a secure OST to Office 365 migration without needing a password and upload OST to Office 365 mailbox of Impersonate User.
Final Word:
In this article, I tried to explain how one could upload OST file to Office 365 mailbox using both the manual or professional technique. If you have any queries related to OST to Office 365 conversion then you can ask me in the comment section.