Mac users often complain about mistaken deletions, hard disk corruption, partition/disk formatting, hardware failures, macOS reinstallation, system crashes, lost partition, etc. These problems are common in other machines, such as Windows and Android. In this situation, data recovery mac becomes a necessity.
Feel free to get started with iSkysoft data recovery software. With this tool, you can backup data, recover deleted files, and restore important information from deleted recycle bin. You can start the recovery process within three crucial steps:
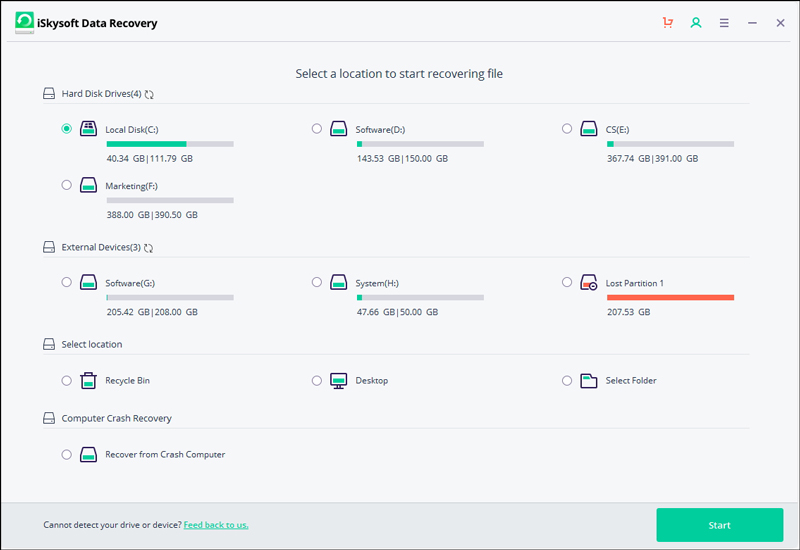
Download and install iSkysoft data recovery software. You have to choose a suitable option to start data recovery. For instance, if you want to learn how to recover deleted files from recycle bin, choose “Recycle Bin Recovery”.
With its in-depth scanning features, data recovery is guaranteed even from a formatted drive. After your selection, the software will start its work to recover deleted files available on the trash can.
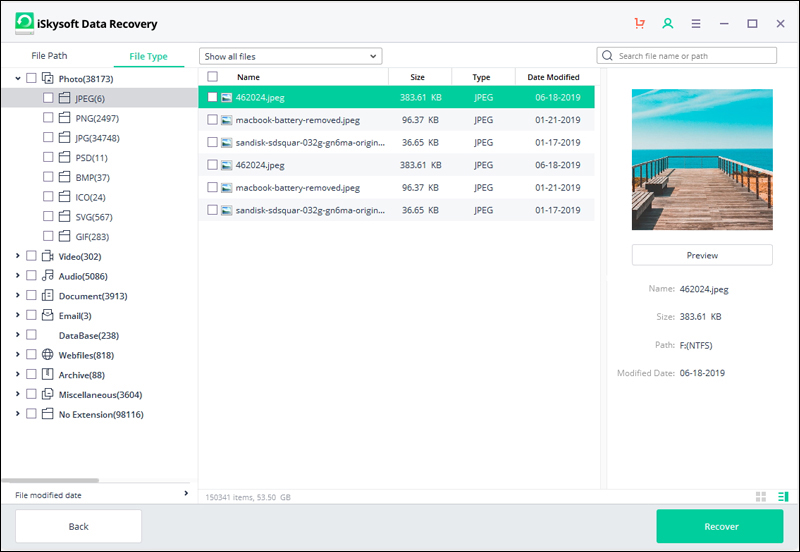
Once the scanning procedure is over, you can see the list of deleted data from a hard disk or a recycle bin. Feel free to recover specific files or select all files for recovery.
After data recovery mac, you have to save this data on an external hard drive or a new location. It is necessary to avoid overwriting on a hard drive.
Regular Backups to Recover Deleted Files
If you want to protect yourself from the hassle of data loss, you have to back up your data. For this process, the Time Machine of macOS can be a suitable choice. It is a built-in method to manage automatic backups. You will need an old hard drive, hook this drive up, and navigate to preferences of your system – Time Machine – Choose Backup Disk. At this stage, you can pick an external hard drive and activate automatic backups.
Time Machine is a suitable option to backup data of your computer on your hard drive. With this option, you can travel back in time to get the old versions of files. Sometimes, you can’t trust an old hard drive or need an extra offsite backup. In this situation, you can use online storage services, such as Dropbox, Google Drive, etc.
Check Trash Can
Once you hit delete, your files transfer in a trash can. These will stay in this folder for almost 30 days or until you manually delete these files permanently. For this reason, you must check your trash can once to recover data.
Check your dock to find trash and right-click its icon to use “Open” command. You will get a list of files available in the trash can and restore them quickly to their original place.
Check Other Storage Options
Make sure to store your files on external hard drives or USB flash drives. To find a particular file, don’t forget to check hidden folders in external storage drives. Make sure to enable hidden files in macOS Sierra with the use of SHIFT + CMD + hotkey.
For older version of OS X, you can press Command + Space and finally type “Terminal” to activate hidden files. You have to run specific commands to see “Trash” folders.
Protect Data with Disk Encryption
Mac needs a sound security strategy; therefore, you have to encrypt data folders and files. By enabling encryption for full disk, you can add an extra protection layer. In this situation, you can protect data of your Mac from thieves.
Get the advantage of FileVault of Apple to encrypt your hard drive with XTS-AES 128. It is a reliable algorithm for encryption. Make sure to enable this feature on your MacBooks and Macs. With activated FileVault, the entire drive will be locked up and encrypted. Remember, this option will only allow authorized users to turn on the Mac and unlock the content of the hard drive.
To activate this option, you have to access “System Preferences – Security & Privacy – FileVault”. With these options, it will be easy for you to turn on this feature. You must have access to the administrator’s account to activate FileVault.
Audit Privacy and Security Settings
Are you comfortable in sharing your location with numerous apps? Do you understand the actual purpose of these apps behind receiving your details? To understand all this, you will need a visit in system preferences of OS X.
Make sure to update the settings of your system with the use of security and privacy setting. Feel free to select location services and check their actual status. If all apps can access your private details, you can change these settings. To make necessary changes, you have to unlock the padlock with an administrator’s password.
Frequently check updates of your software. Keep all software and programs updated to decrease issues related to malware. Remember, malicious attackers often target obsolete software and operating systems. With the help of the software update, you can increase the security of your Mac machine.