Before getting into the actual process of how to setup Google public DNS IPs for the internet connection, let us first know what this DNS and Google Public DNS IPs actually are, and why should we try using Google Public DNS IPs for internet connections.

Domain Name System (DNS) is an essential component of the web’s infrastructure as it serves as the Internet’s phone book that translates human-friendly computer hostnames into IP addresses to render the corresponding web-pages.
For example, the domain name www.publicdns.com translates to the addresses 192.0.32.10 (IPv4) and 2620:0:2d0:200::10 (IPv6). And by default, your computer network settings are configured to use your ISP’s DNS servers and every time you type a domain name or its IP address in your browser, your computer performs a DNS lookup before the web page starts loading. So the more the internet usage is, more will be the number of DNS lookups bearing much load on your ISP’s domain name servers and ultimately slowing down your browsing experience.
As the best alternative to your ISP’s DNS servers, you have the option to use Google Public DNS which is a free, global Domain Name System (DNS) resolution service that boasts itself to speed-up your browsing experience with improved levels of security and performance. And literally it can be easily understood that the IP addresses used by Google public DNS servers are called Google Public DNS IPs which are as follow:
- 8.8.8.8
- 8.8.4.4
Often times, these Google Public DNS IPs come most handy when there are some DNS issues with your ISP that is blocking your favorite website, in which case you can access the site if you can setup Google Public DNS IPs for your internet connection. You need to have administrator/root privileges to change these DNS server settings.
How to Setup Google Public DNS IPs for Your Internet Connection on Microsoft Windows XP
- Click Start, click Run… and type control and then click OK. This takes you to your Windows Control Panel.

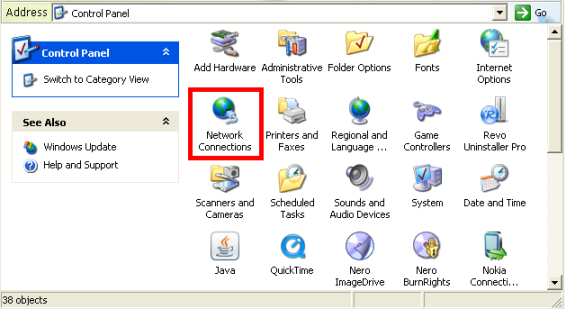
- Depending upon the way your control panel items are displayed, choose Network and Internet Connections in category view or Network Connections when the objects are displayed in classical view.
  
 
Control Panel Category View and Classical View (click to enlarge) - From your network connections listed, select the active connection for which you want to want to configure Google Public DNS. Whether it may be your Ethernet (LAN) connection or wireless connection, right-click on it, and click Properties.

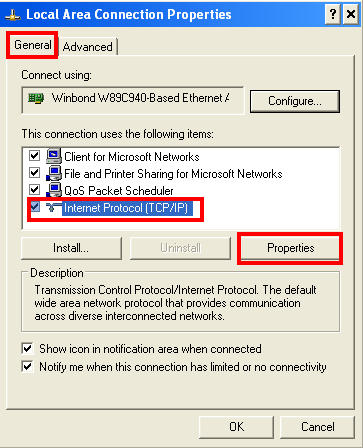
Network Connections - Under General tab where it says “This connection uses the following items” select Internet Protocol (TCP/IP) and click “Properties”.

- Before actually changing your server settings, make sure you write down your current IP settings and the DNS server addresses for future reference or backup purposes.
Now, replace your preferred and alternate DNS server addresses with the IP addresses of the Google DNS servers: 8.8.8.8 and 8.8.4.4

- Finally click OK and then Close Network Connection Properties window.


That’s it!! You have setup Google Public DNS IPs for your Internet connection. To test how successful your new settings are, try browsing as you would normally do and if you can access the webpages then everything is working correctly.
Try this yourself and let me know how it works for you!
Hey there, i hope you don’t mind this somewhat off-topic comment, but i was wondering if you knew how to permanently turn off google instant? It’s driving me crazy! I know that you can change settings under settings but it still pops up. Thanks for this tip though about setting up a DNS – i have an old laptop that i don’t really use because it’s
running XP. I’ll give it a go and report back! 🙂
To permanently turn off Google instant on Firefox, so that it doesn't pop-up again each time you open your browser, you can try saving your Firefox preferences and protect them from being changed at a later time. check out my recent post @ http://www.tech-wonders.com/2010/12/how-to-permanently-turn-off-google.html where I have mentioned step-by-step how it can be done. Hope this helps…